How to Install Your LED Neon Sign
WHAT'S IN THE BOXES? UNBOXING AND PRODUCT DEMO
Example product: "But first, Coffee" LED neon sign
When you buy an LED neon sign from Neon Party® you can choose one of the following installation kits:
| 1. Screw Fixing Installation (Most Popular) | 2.Hanging with Chain |
| 3. Hanging with Steel Wire (best for windows & visual displays in a store front) | 4.What's in the box |
When you place an order you will also receive a free remote-controlled dimmer.
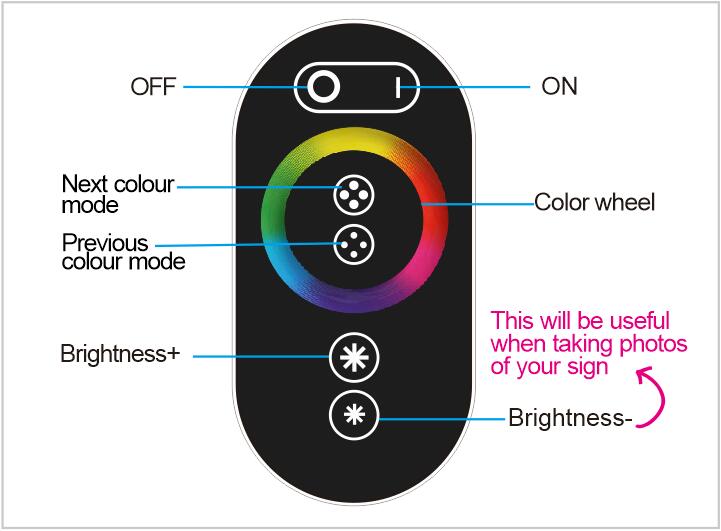
Single colour dimmer remote (left picture) or RGB colour changing dimmer remote (right picture). We configure the corresponding dimmer according to your order options.
 |
 |
| Single colour dimmer remote: | RGB colour dimmer remote: |
If you'd like more information on how to install your LED neon sign, please refer to the below manual:
Overview Assembly:
|
Screw Fixing:
|
| 1. LED neon sign 2. Mounting holes 3. Acrylic backboard 4. Power cord 5. Dimmer 6. Power adapter 7. Installation accessories (wire hanging, screw fixing, or chain hanging) 8. Remote (single colour or RGB colour changing) |
Instructions: 1. Once you have decided where you are going to hang your LED neon sign, grab a pencil and make a small mark on the wall through the centre of each hole. 2. Drill 2.5cm holes where you have marked the wall. Then, put a wall plug in each hole. 3. Put each screw into the largest opening of an advertising screw then drill these into the holes in the wall. The holes in the acrylic backing should be lined up with the advertising screws behind the sign. 4. Place a jelly washer on top of each advertising screw. Then, tightly screw the head of each advertising screw into the openings behind the LED neon sign. |
Chain Hanging:
|
Wire Hanging:
|
|
Instructions: 1. Attach the hooks of the chain to the holes in the acrylic backing of your LED neon sign. Depending on the size of your LED neon sign, you can choose to use either one or both chains. 2. Attach the hooks at the other end of the chain to your chosen hardware. We recommend hanging the chain to the screws provided. However, how you display your LED neon sign is completely up to you! |
Instructions: 1. Attach the hooks of the chain to the holes in the acrylic backing of your LED neon sign. Depending on the size of your LED neon sign, you can choose to use either one or both chains. 2. Attach the hooks at the other end of the chain to your chosen hardware. We recommend hanging the chain to the screws provided. However, how you display your LED neon sign is completely up to you! |
Click to view ➦ New Magic LED Neon Sign Installation
— 6 methods for seamless, temporary & renter-friendly installation! Easier and faster!


